By default when a Linux distro is being installed on WSL, it will be installed on the primary drive or OS drive. The default installation drive for installing applications is usually the primary drive, over time the primary drive might run out of space. Installing WSL on a secondary or a different drive would be an option if the primary drive is low in disk space or it would be the user’s preference.
Prerequisites
- User has admin rights to the PC/laptop
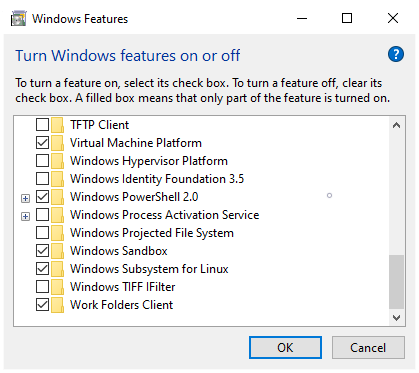
- WSL (Windows Subsystem for Linux) feature in Windows should be turned-on .

- Run Windows update to get WSL version 2
- Run the Linux kernel update
- Set the default version of WSL to 2.
- Go to Windows Command Prompt (i.e.
cmd) - Run the following command
wsl --set-default-version 2
- Go to Windows Command Prompt (i.e.
- Powershell installed (by default it is installed with Windows)
- Identify the disk drive on where to install the Linux distro. The disk drive could be an internal disk drive in PC / laptop or it can be an external USB disk drive. The disk drive can be a HDD (hard disk drive) or SSD (solid state drive).
Downloading a WSL distro
For illustration purposes, Ubuntu 20.04 will be used.
Using Web Browser
Open your favorite browser and go to https://aka.ms/wslubuntu2004, this will download the Distro around (400MB+)
Using Windows Powershell
Open PowerShell terminal, and execute the following command
Invoke-WebRequest -Uri https://aka.ms/wslubuntu2004 -OutFile Ubuntu.appx -UseBasicParsingNote: Depending on your internet speed, downloading it through Powershell might take some time compared to doing it over the browser.
Installing the downloaded Distro
For illustration purposes, it uses D drive (i.e.D:)
Step 1. Open Powershell terminal, change drive to D:
PS C:Usersminemo> D:
PS D:>
Step 2. Create a folder named “WSL” or whatever folder name to denote that it will be a placeholder for WSL distros.
PS D:>dir

  Directory: D:

Mode                 LastWriteTime         Length Name
----                 -------------         ------ ----
d-----        15/08/2021  10:01 pm                WSL

PS D:WSL>
Step 3. Move the downloaded file to D:WSL, below is an illustration once the file has been moved
PS D:WSL> dir

  Directory: D:WSL

Mode                 LastWriteTime         Length Name
----                 -------------         ------ ----
-a----        15/08/2021   9:40 pm      452997756 Ubuntu.appx

PS D:WSL>
Step 4. Rename the downloaded file, move .Ubuntu.appx .Ubuntu.zip
PS D:WSL> move .Ubuntu.appx .Ubuntu.zip
PS D:WSL> dir

  Directory: D:WSL

Mode                 LastWriteTime         Length Name
----                 -------------         ------ ----
-a----        15/08/2021   9:40 pm      452997756 Ubuntu.zip

PS D:WSL>
Step 5. Extract the zip to Ubuntu folder, by executing the Expand-Archive .Ubunutu.zip
PS D:WSL> Expand-Archive .Ubuntu.zip
PS D:WSL> dir

  Directory: D:WSL

Mode                 LastWriteTime         Length Name
----                 -------------         ------ ----
d-----        15/08/2021  10:01 pm                Ubuntu
-a----        15/08/2021   9:40 pm      452997756 Ubuntu.zip

PS D:WSL>
Step 6. Go to Ubuntu folder, then run .Ubuntu2004.exe. This will take time to install the distro once installed it would prompt for a username and password. Once the username and password is set you will be redirected to Ubuntu 20.04 as shown below
PS D:WSL> cd Ubuntu
PS D:WSLUbuntu> .Ubuntu2004.exe
Installing, this may take a few minutes...
Please create a default UNIX user account. The username does not need to match your Windows username.
For more information visit: https://aka.ms/wslusers
Enter new UNIX username: minemo
New password:
Retype new password:
passwd: password updated successfully
Installation successful!
To run a command as administrator (user "root"), use "sudo <command>".
See "man sudo_root" for details.

Welcome to Ubuntu 20.04 LTS (GNU/Linux 5.10.16.3-microsoft-standard-WSL2 x86_64)

 * Documentation:  https://help.ubuntu.com
 * Management:     https://landscape.canonical.com
 * Support:        https://ubuntu.com/advantage

  System information as of Sun Aug 15 21:56:10 CST 2021

  System load:  0.14               Processes:             8
  Usage of /:   0.4% of 250.98GB   Users logged in:       0
  Memory usage: 2%                 IPv4 address for eth0: 172.25.211.10
  Swap usage:   0%

0 updates can be installed immediately.
0 of these updates are security updates.


The list of available updates is more than a week old.
To check for new updates run: sudo apt update


This message is shown once once a day. To disable it please create the
/home/minemo/.hushlogin file.
minemo@DUMMYPC:~$
To go back to Windows, simply type exit to end the session in Ubuntu. At this stage Ubuntu distro is successfully installed.
Step 7 Set default distro to Ubuntu. It is possible that there are multiple distro installed prior to the Ubuntu. To set Ubuntu as the default distro, run wsl -s Ubuntu-20.04
PS D:wslUbuntu> wsl -l --all
Windows Subsystem for Linux Distributions:
docker-desktop (Default)
docker-desktop-data
Ubuntu-20.04
PS D:wslUbuntu>wsl -s Ubuntu-20.04
PS D:wslUbuntu>wsl -l --all
Windows Subsystem for Linux Distributions:
Ubuntu-20.04 (Default)
docker-desktop
docker-desktop-data
PS D:wslUbuntu> wsl -l -v
  NAME                   STATE           VERSION
* Ubuntu-20.04           Running         2
  docker-desktop         Running         2
  docker-desktop-data    Running         2
PS D:wslUbuntu>
Where are the files installed?
Continuing on Step 7, view the files under D:WSLUbuntu
PS D:WSLUbuntu> dir

    Directory: D:WSLUbuntu

Mode                 LastWriteTime         Length Name
----                 -------------         ------ ----
d-----        15/08/2021   9:53 pm                AppxMetadata
d-----        15/08/2021   9:53 pm                Assets
-a----        23/04/2020   4:01 pm         418038 AppxBlockMap.xml
-a----        23/04/2020   4:01 pm           3709 AppxManifest.xml
-a----        23/04/2020   4:04 pm          10951 AppxSignature.p7x
-a----        16/08/2021   1:14 am     1350565888 ext4.vhdx
-a----        23/04/2020   4:01 pm      452534052 install.tar.gz
-a----        23/04/2020   4:01 pm           3544 resources.pri
-a----        23/04/2020   4:01 pm         468480 ubuntu2004.exe
-a----        23/04/2020   4:01 pm            744 [Content_Types].xml

PS D:WSLUbuntu>
Take a look at the file,ext4.vhdx, that is a virtual hard drive that will be used by WSL for Ubuntu.
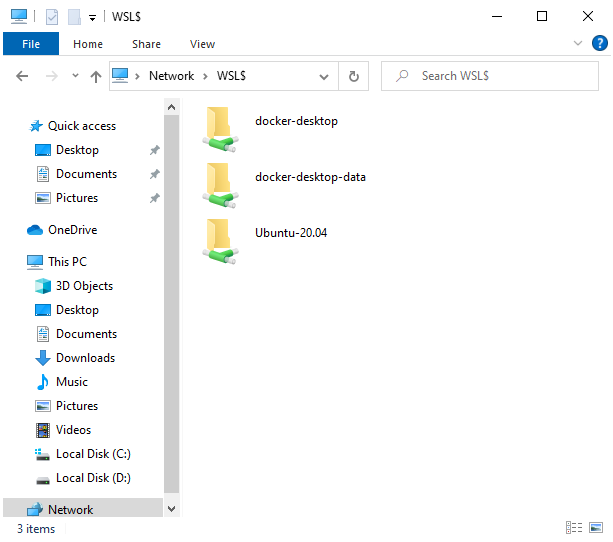
To look into the files, go to File Explorer and type-in WSL$ in the search bar and press Enter. It would display all the mount drives on the WSL distros in your system. Below is a sample screenshot.

Takeaways
- Installing Linux distros in a different drive would avoid having disk space problems in the primary or OS drive. Initial vhdx (virtual hard disk) size is around 1.3GB, once additional updates or applications will be installed on the distro the vhdx file would grow.